Saturday, December 27, 2014

The progress... it progresses...


Quick update before I head off to bed. Haven't gotten the new photo set up ready yet, but I plan to before New Year's.
  • Scarecrow is progressing along nicely. Finished up the Trousers and did some touch up on his shirt... mainly to clean up some of the shadows. I also gave the base it's initial coat and is now ready for drybrushing. I plan to use gray rather than brown to give the appearance of fallow earth and should work nice with my Wasteland Tufts from Army Painter.
  • Viktor got some metallic paint added, but not much more than that. His replacement arm showed up Wednesday along with a bunch of 40mm lipped bases.
  • Far right you will another Wargames Factory Viking. I'm painting him up for use with Saga and will attempt to give him a really nice high end paint job.
Going to be prepping a half giant model this weekend.

Sunday, December 21, 2014

Pre Holidays Painting Extravaganza...


Only a few more days until my new photography rig shows up. Eager to see how using a proper set up will affect things. Once that is all set up, I'll be posting fancy versions of all the finished stuff from 2014... including Hellakin as I just wrapped him up this evening. He's been on the table for about four months now getting all the left over paint and any time I had while stuff dried... so kind of a momentous occasion.

Pictured above are the Pathfinder Scarecrow who is nearing the half way point, Viktor Pendrak who is eeking into the 65% done zone, and a Bones Rat which is about at 75% (they are pretty easy to paint once you have a process down).

Spent a fair chunk of Saturday on the Scarecrow's shirt as there is about 8 layers and glazes in that thing. I also added a glaze of Bugman's Glow to the stitched areas on the arm to kinda give them an swollen and infected look. Can't really see it in the photo, but it does give them a little more definition.

Viktor has had his armor and flesh finished. I don't paint the eyes on this model as they barely visible behind the glasses. Next up on him is to finish his boots and start on the critter head.

Rat #2 has had the basic dark basecoat and the first round of drybrushing on him. He'll get a couple more rounds of drybrushing, a quick glaze and then I'll pick out the details. Again, gonna say how great Reaper's Bones are for padding out your monsters and encounters, but not so much for Player Characters or any sort of Boss model.

Monday, December 15, 2014

Some progress is better than no progress at all I guess...


Things have sort of slowed down a bit since the Thanksgiving holidays due to a hectic work schedule and a lot of other varying sorts of "time thiefs". Right now, my workbench consists of the Pathfinder Scarecrow Flesh Golem, Viktor Pendrake, and Hellakin Goregutter (kind of an odd name for halfling).

The Scarecrow is in the early stages although I've gotten his arm and torso almost done. Holding off on adding fine details until I get the shirt painted as I'm sure I'll end up doing a touch up or two. Have to admit, I am not a fan of the pose... profile type poses are the worst to paint and to photograph.

Viktor is a little further along than the last time you saw him. The flesh on the face is done as is the black armor. I did notice that I was wrong in assuming is books were in holsters... they are in pockets in his overcoat. So, I will be painting those before I progress any further. ou can also see I've started to undercoat the gold areas with brown. Much happier with this version of Viktor than the previous version.

Hellakin is one of my Bones miniatures I bought on Ebay earlier in the year. The model isn't too far off from the metal version although there is some funkiness with the hair and face. Thus far, Hellakin has been my paint bitch for the last couple of months... he gets painted with left over colors from various other models... the browns are from the Half Orc's leathers, the flesh left over from Viktor, I think the green was from a pirate model I started in October. It's a nice way for paint to not go to waste and for you to get another model painted at the same time. I have to admit I'm rather pleased with him... not something I'd sell on eBay, but definitely a model worthy to be used as a PC or NPC. As always, I advise using a the Foundry Painting Style or "layering" for these as washing and glazing don't always work well with the casting of Bones models.

Tuesday, December 2, 2014

Half Orc is done and I can't seem to take a decent photo of him...

Gonna set up the fancy photography set-up out this weekend so I can snap a decent photo. The camera on my phone does in a pinch though for WIPs most of the time.

The big difference between this photo and the last is the addition of metallics. I kept it simple, Boltgun Metal was used on the blades while Vallejo Old Gold was used on his "loot". The gold was shaded using Golden Burnt Umber applied in two thin washes while the Boltgun Metal was shaded with Nuln Oil. The gold was higlighted by adding small amounts of Folk Art Pearl White to the Vallejo Gold. I didn't highlight all the way to silver as that would have been too shiny and out of place on the model. The Boltgun Metal was highlighted with Folk Art Silver and then an additional wash of Vallejo Rust gave the blades a weathered look.

You might also notice the crazy amount of leather and hides on this guy. I used five different browns for the various leathers and Rakarth Flesh for the exposed hides. These contrast very nicely with the reddish fleshtone but don't clash with it. My rule of thumb, if it has a sort of warm glow you are on the right track.

Wednesday, November 26, 2014

Rat Bastard!

Got some more done on the Half Orc (not as much as I'd have liked to) and I also painted a Giant Rat from Reaper's Bones line.

First up, the Half Orc. As you can see he now has his weapon attached and the painting has begun on that new edition. I'm also going in and doing up all the details on his trousers and boots now. As this is a Tre Manor model, there are tons of details. I'm hoping the holidays will give me some time to wrap him up.

Now the rat. Okay, this is one of those models where the problems with all the Bones stuff really show up. Normally, when the detail on one of these is lacking, I'll paint it in myself like the fur on the big ass orc I painted earlier in the year. However, when the model you are painting is covered in fur... that lack of detail can become problematic. On this one, I basecoated dark and then drybrushed the shit out of it. Once I'd finished that, I glazed it with some Agrax Earthshade to cut down on the dusty effect drybrushing creates. At that point, I decided to pick out the details and roll with it. The tail is Rakarth Flesh that was washed with Army Painter Strong Shade as I needed a vivid divider between the tail and the floor. I did add some Nurgle's Rot to the base and paws to give it a little more character. I guess the important thing to remember about the rats is they are a group or horde and not a single model. In that context, it looks pretty good I think.

Time to wrap things up... my mom will be here in two hours for Thanksgiving extravaganza.

Tuesday, November 18, 2014

Half Orc Half WayDone... I think

He's gettin' there. Probably would have had more progress had Warlords of Draenor not released last week. The upper body is almost done, just need to paint the feathers on the arrow and add some dark blue to the tattoos.

The next step on this guy will be the loin cloth thing and the gear around his waist. All the ornate stuff I'm treating as "loot" from one of his many adventures as he's obviously not someone who'd normally be carrying such fancy and ornate weaponry and artifacts.

After that come the legs and boots...probably the fastest and easiest part as they are mostly bornw. I'm using Rakarth Flesh on the cuffs of his boots...basically going for a bare hide or the underside of a hide there. With so many different browns being used for leathers, Rakarth Flesh is a nice way to break up all that brown.

Once all that is done, I still have his wierd axe staff thing to do, but I doubt it will take very long.

Saturday, November 8, 2014

On the painting table this week...


I haven't done this style of post in a long time but I figure what better way to come back from a month of blog silence.

The models I have going at the moment (from left to right):
  • Old Glory Pirate Captain - Why am I painting Old Glory again? I think it was mainly the model had been sitting in my "to do" pile for the last 12-13 years and I figured what the hell. For those who may wonder, his main colors have been Gretchin Green (coat), Codex Gray (shirt and cuffs), and Gnarloc Green (pants). I didn't start out trying to use as much GW paint on him intentionally but I have been trying to use more of my vast paint stash (trust me...it's massive and takes up just as much space as my miniatures). I'm painting him using my historicals layering style (although I use it for a lot of other stuff as well).
  • Viktor Pendrake - I am painting two of these for a friend. The first one I am revisiting the Trigun styled version of Viktor I did in 2011. To the far right you can see all the paints I have gathered for this fella. His cloak will be base coated with Ceramcoat Barn Red (or maybe Apple Barrel Barn Red...whichever looks nicer). His armor will be done as a black laquered armor (maybe some battle damage chipping) and his trousers possibly striped using Ceramcoat Charcoal as a base.
  • Half Orc Barbarian Dude - Another model for a friend. For this one, I'm going in a different direction on the orc fleshtone...pulling from World of Warcraft rather than Warhammer. I'm going with a reddish brown tone similar to that of Garrosh Hellscream's. I think if I use regular flesh tone to create the highlights, it should give me a really cool look. If not, then it's time for the Pinesol. I also intend to add a couple of tribal tattoos to the left arm and possible the face. For these, Ceramcoat Charcoal mixed with Apple Barrel Black as a base (might add some flow improver to give me a little more precision). His clothing will be done in all earthtones as he is clad in furs and leather.  If this works, I think all my RPG orcs are going this route as there is only so much green flesh I can handle.
Tune in next time when I'll have in progress shots....and hopefully not take a month between posts next time.

Sunday, October 19, 2014

Orktober...getting kind of tired of painting green...

Headline says it all. Getting burned out on Orks, Goblins, and whatever. I think part of the problem is 2014 Mike painting models 2000 Mike prepped. I keep running into some really horrible mold lines and painting fully assembled models doesn't really lend itself to my style of painting. 

Strongly thinking about killing the theme thing early and just setting a goal of a certain amount painted per month or something. Nothing wrong with theme months... but doing what I do for a living with dealing with multiple projects with multiple themes on multiple deadlines... need a little break from that. Maybe I'll give it another whirl when things settle down.

Enough of me whining, let's move onto the painting stuff.

I finished the first Night Goblin. While I'm not 100% thrilled with the end result, I still think he looks pretty badass for a rank and file model. Opted to go with an old mid 90s shield as they are bigger, but not nearly as thick as the 2000s shields. It's a personal preference and I will eventually mix and match the shields as Goblins are supposed to be sort of ramshackle in appearance.

Again, not 100% satisified...but I'm at about 90%. Not what I'd want for a command or personality model, but fantastic for rank and file.

There is a zombie beside him. Nothing new...I just rebased her on a metal washer base.

Now I'm off to ponder what to paint next as my enthusiasm for painting green flesh has gone kaput. Maybe a barbarian or something like that.

Wednesday, October 15, 2014

Orktober... it keeps on keeping on.


Continuing the fine tradition of painting greenskins this week with a quick update. Still looks like I can hit my 4 models for the month goal, although work has been kicking my ass lately.

Night Goblin is coming along nicely. His tunic is almost done...just needs another two passes for highlights. Once that's done, shoes and skin will be quick. Debating on what to do wht the spear now... mainly as it's a little bent. I'm thinking of doing woodgrain to give the impression the spears are made from tree limbs and saplings...so a degree of "bending" would occur naturally. Still, really having fun with that model (and very happy with how the nose and lips turned out).

Space Ork...I think he's about where he was last update. I did a little more work on his jerkin and blacklined around his leather straps and the jerkin. Well, I don't call it black lining, but I do use very dilute black paint to create a shadow. Years ago, I did the full on black line... but after reading through the Rackham painting guide a few years back, this seemed like a logical progresssion. 

I've also started thinking about what to paint for November as a theme. The obvious choices are something like Norsevember or Nobvember... but don't think I want to paint vikings or orks as I've spent the last couple of months on those. Thinking now about No Plastics November...or Nudevember... 

Could just go with no theme at all for November... I dunno.

Sunday, October 12, 2014

Orktoberfest continueth!

The Orktoberfest celebrations continue (and by celebrations, I mean me sitting in my little hobby room painting little plastic army men).

The bulk of the work on Saturday and today has been on the Space Ork's torso (although by bulk, I mean a couple of hours). Instead of painting yesterday, I put in about three or four hours working on some books and between that and errands, time kinda got a way from me.

Thus far I'm happy with the overall color scheme as I wanted to go Goffs but still work in some the earth tones that were used with Grimskull's Waagh in the Space Marine video game. I opted to shuffle some things around to get it more "Goffy". I used the reddish brown on his trousers rather than his jerkin. I also swapped out the leather colors and used brown for leather and black for his jerkin and the base for his armor plates. His shoulder pad will get the standard Goff check pattern (with a lot of rust and chipping) and I may opt for a Goff glyph on his back plate.

I took a big shortcut on his jerkin. I basecoated it with Ceramcoat Charcoal and then washed it with Nuln Oil. I built up the gray by adding small amounts of Vallejo Gray to the Charcoal. I'd then glaze between each highlight to blend the previous layer. I don't think extreme highlighting would work with Ork clothing as that seems to suggest a pristine surface (and Orks don't do pristine).

The fellow beside the Ork is a Night Goblin from the early 2000s box set. I think I have two or three of these. I've not really done anything with the since skull pass came out as the size difference between the models is very noticeable (like hobgoblins vs goblins). Thus far, I have only basecoated him and did the first wash. The green I'm using is basically Ceramcoat Kelly Green mixed with a bit of Ceramcoat Antique Gold. It's similar to Gnarloc Green but has a little more yellow to it. I had to do my own color as I hate the bluish green all the GW orks seem to have these days.

Now, I'm off to a pet halloween thing in Suwanee. Bella is wearing her mummy sweater and tutu... no idea what costume that is, but that's what she's wearing.

Thursday, October 9, 2014

Orktoberfest continues!

Finished the goblin finally. Got sidetracked by mysterious leg pains and sinus attacks (been a rough week thus far). 

While he isn't the greatest model GW ever produced (as there is no detail on his left hand or foot), he was still a lot of fun to paint. Did a lot of blending and glazing on him, especially around his face.

The Space Ork head next to him is also done. Photo doesn't really show it, but I opted for the baleful yellow eyes rather than the cartoonier red ones. Did a little bit of texturing on the teeth... but I didn't go too far as it just wasn't showing up as well.

I'll be tackling the body next and then I'll tackle a fantasy Orc or a Night Goblin.

Tuesday, October 7, 2014

Orktober!

After finishing the two Viking Huscarls, I decided it was time to take a step back from my usual routine and shake things up a little. 

For Orktober, I've opted to:
a. paint only GW Orcs and Goblins (or Space Orks and Grots)
b. go all out on them... blending, freehand, the whole nine yards (but no NMM).

Why? Easy, I was in a rut and I needed to remind myself that I could still do the "fancy" painting. I really haven't done any or attempted to do any for close on to a year... possibly longer. It isn't the first time this has happened. Something happens and you lose your mojo for a while. After all the stuff that's happened t me over the last couple of years, I'm surprised I hadn't lost it sooner. However, slowly but surely I've been regaining my confidence and hopefully I'll get it back to where it was before 2010.

Anyway... as you can see the first model I've worked on is a goblin from Warhammer Quest. I'd almost say he was a snotling, but he's too big and he's about the same size as the goblin models from the mid 90s. I believe this little guy is also an extra on the early 2000s Night Goblin sprue (either that or the Orcs). But I figured he was a fun model to start with. I'm using Gnarloc Green (Loren Green) and adding Vallejo Undead Flesh to create the highlights. His nose and lower lip were painted with Army Painter Tanned Flesh (how the hell that is considered fleshtone is beyond me). He's about 90% done...just need to paint his feet, claws, spike, and loin cloth. He's affixed to his base using Loctite Silicone Adhesive. I use the same thing to attach Zombicide models to the clear acrylic bases. It's got a bit of flex to it and you don't get any sort of "frosting" on your paint (or clear bases). Yes, it goes on white but cures clear.

Space Ork beside him I started while the Loctite on the goblin was drying. He has had the same colors applied. His teeth have been painted with Ceramcoat Old Parchment mixed with Ceramcoat Charcoal. I'll wash over this with a yellowish brown and then go back over it with Old Parchment. Still debating yellow or red eyes (I hate the red eyes on orks...don't look quite right).

Thursday, October 2, 2014

Huscarls prefer Hákarl 2 to 1

Every I think of Vikings, I think of Hákarl (not to be confused with Hot Carl)...which is basically Icelandic Pee Shark.

Tonight's post is all about the two Huscarls that I have completed over the last week and a half. Actually, I think I've spent maybe about 12 hours combined on both of them (I only get a couple of hours a night if I'm lucky during the week...and sometimes that's how it is on the weekends as well...busy, busy, busy). As my time is short at the moment, I have opted to use a layered painting style as the bulk of Foundry's models really don't warrant the usual blending and glazing I usually use.

Let me say right off the bat, Foundry have some of the best historical models on the market. Howver, a lot of their models suffer from the fact they are from the mid to late 90s. I think I saw these guys in a copy of Wargames Illustrated I bought back in 98 (the one with the Barbarian Army Rules for Warhammer). I bought most of these guys back in 2000 and 2001 while I was in my "I'm Going to Build a Viking Army for Warhammer Ancients" phase. Looking back now, I can say that was a stupid idea especially as now I want to collect a Roman army for Warhammer Ancients (or a nice British Army for Napoleonics). 

Both were underocated black with Wal Mart Flat Black paint. For the money, you really can't beat it for priming metal models. Both were painted with a combination of Citadel and Ceramcoat paints. As I mentioned I used a layered painting style, although I use washes rather than basecoating dark and building up. I do this mainly so I get some smooth transitions. Both models are based on 1 inch metal fender washers as I want my models to look as cool as Kevin Dallimore or Steve Dean's models (both a major inspiration for historical painting).

Still haven't decided on what I'm doing with these guys once they are done. Strongly thinking about putting them on Ebay... but then I change my mind as I regret selling a lot of my painted stuff over the years. Sold some really nice Confrontation models off for some good money back in the day, but I'd much rather have the Wolfen Grave Guardian or Griffon Hunter of Darkness that a few extra bucks to spend on Warhammer.

Sunday, September 28, 2014

More Vikings than you can shake an Amon Amarth at...


Or in this case two. Granted, I have about 30 in my unpainted pile and the bulk of them are from Wargames Factory, but that's still quite a bit.

Right now the one I'm focused on is the handsome fellow in the middle. All he really needs is his fleshtone, woodgrain, and final metal bits painted and he's done. The part you don't see that I have to finish is his shield (which I still need to primer). He is pretty close to being done...I'd call it 80%. Might need to do some minor bits of black lining around the armor areas...maybe add some final highlights to his trousers. Still should be able to wrap him up by Tuesday evening if all goes well.

Other two are guys that happened to be on the table when I had some extra blue on my palette. The Huscarl on the left is #3 of the six I'm currently working on. The last three still need to be prepped as they are still just bare metal superglued to a fender washer. But those four remaining Huscarls are my goal for November. 

The six were originally bought to be used as Norse Raiders for Mordheim. I had also picked up a couple of other models that were similar style and scale for use as Berserkers and even a werebear. I've toyed with doing a Warhammer Ancients or Saga army with them, but now they are pretty much just part of the collection. Luckily, since I based them the same as my D&D models...I could absorb them into that collection as some sort of Norse themed band of brigands.

Wednesday, September 24, 2014

"We are the guardians of Asgard..."


Started on the three of these on Sunday with the intent of painting all three simultaneously in an effort to speed up my painting. Didn't go so well as my workflow doesn't really lend itself to that sort of paiting. So once I finish up these fellas, I'm going to find some models that have similar color schemes and try to paint multiples again. 

I did manage to basecoat all their bases and drybrush the chainmail at the same time... so I got that going for me. Once that was done and I figured out that green/tan have nothing in common with blue/red or blue/brown, I decided to focuse on the green/tan viking. I really should be tired of green and khaki/tan after the Zombicide Fatty, but apparently not.

Colors used for viking dude thus far:
  • Tunic - GW Loren Green (or Gnarloc Green if you still have Foundation Paints like I do).
  • Chainmail - Vallejo Natural Steel with glazes of P3 Armor Wash and AP Strong Shade ink.
  • Pants - Vallejo Khaki and shaded with AP Strong Shade ink.
  • Leather, Axe, and Base Edge - Ceramcoat Autumn Brown. For the edge of the base, I mixed in a little Future Floor Polish to give it a smooth finish as that stuff is self leveling.
  • Flesh - My own mix of Ceramcoat Medium Flesh, Ceramcoat Charcoal, Ceramcoat Autumn Brown, and a touch of Testor's Model Master Skin Ton Warm Tint.
  • Beard and Hair - Ceramcoat Antique Gold mixed with a little Ceramcoat Charcoal. It was built up by adding Ceramcoat Sandstone.
As always, the style I'm using for these models is a hybrid of Classic GW and Foundry styles It's a very simple "graphic" style of painting, but looks really good when models are in large groups.

Still don't know if I'm going to finish out all three before moving onto a new project. I had thought of attempting painting two space orks at the same time (as all of those pretty much have the same color scheme). I've been really wanting to paint up my Ork Mob in the style of Boss Grimskull's Waagh! from the Space Marine video game. Also thinking of working in some WWII color motif's like Cyril Abati does (that dude is amazing).

Monday, September 22, 2014

Photo Experiment....

In olden times, I'd have taken the shot against a white background and inserted the blue gradient and futzed with the levels to get the colors on screen to match the actual colors.However, if you do that now the d-bags on certain sites accuse you of "shopping" (and god forbid you use metallics...which is apparently "easy mode" now).

So, this is my Fatty on my good old standby background...a gray pillow case. Yes, probably should iron it next time.


If this format looks familiar, this is how I used to shoot everything back in 2008 and 2009. Then I got obsessed with the whole "catalog" presentation thing again. All I did on this piece is lighten it so the colors match up the actual model and put together the collage.


Someone break my hands before I pick up a camera again...


Yay...another photo with terrible lighting. I guess I should be happy it's in focus at least. Just a snapshot of the two most recent completions and the In Progress Huscarl. Looking at the photo, I can see he needs some work on his tunic as the shading isn't really coming through (not even going to talk about how dark his chainmail is...I hate painting chainmail).


Friday, September 12, 2014

Before the filth and gore...

Apparently I am still on a streak of awful photography. Wish my phone had a tripod mount on it. Maybe I should just break down and replace the batteries in the real camera. Yeah, probably.

This is the first Fatty out of my Zombicide box set. As you can see, I am completely ignoring the suggested color schemes and going for more realistic color pairings. As there are four Fatties, I will be going with Khaki (as seen here), Blue, Red, and Medium Gray. As they are all insulated coveralls, I'm still pondering what the inner liner colors will be.

The fleshtone is the same zombie color scheme I've been using for a few years now. It's based on the Reaper Bloodless Flesh Triad...although I used Vallejo Undead Flesh this time out as a change up. It's shaded by a wash of Agragax Earthshade and Lich Purple...that way you get filthy and bruise coloration in the recesses. I figured this works more for a Biohazard styled zombie outbreak than a supernatural one.

This is the stage before I start adding all the funky effects...eye glow...gore...extra dirt. For that stuff I start out neat and then get sloppier as I go on. I will be trying out Blood for the Blood God on this one...so wish me luck.

Sunday, September 7, 2014

"There was no sickle...but there definitely was a hammer..."

First Soviet Rifleman finished...although not entirely historically accurate. I had to take some liberties with the colors as their uniforms were sooooo drab. And sweet jesus this photo is horrible... I have got to set a side a weekend for photography (and use my new backdrop).

As you can see, I used my "historical" style on him... which is just a fancy way to say layering. It's very evident on his tunic although I did a little blending on his pants (and even on his helmet). While I don't think he looks particularly awesome on his own, when he is joined by the other 19 guys in his squad they will look great.

And sorry again about that photo. 

Tuesday, September 2, 2014

Historically Delicious...

Over the holiday weekend, I had but one goal...to paint the Vor Neo Sov Mutant Handler guy (also known as Russian Guyovich). But as my two weeks of "stuff turning to crap" continued well into Saturday...I decided to change gears. I looked at Russian Guyovich closely and decided to cut that turd loose and work on something else. 

So, I decided to pull out the historicals again as at least I always manage to get something decent looking from those. I opted to start things off with a WW2 Soviet Rifleman and a WW2 German with a Panzerfaust & SMG. Both are from Black Tree Design (I think) and are actually pretty nice for the price. I think you end up paying about $2.25 per model (but Black Tree runs specials all the time so you can pick them up for a lot cheaper). True, now you can get some really nice Bolt Action stuff from Warlord...but when I picked these guys up back in 2003, your choices were Westwind, Battle Honors, or Easy Eight. Personally,  I like the Black Tree Russians more than the Warlord ones...not as frail and I'm not spending a ton of time assembling them.

As you can see, I've only started on the Russian guy. I've opted to use Citadel Gretchin Green mixed with a dab of Loren Green to paint the uniform. I used straight Gretchin Green for the tunic (it's worn over his blouse and I wanted to have a little contrast). His helmet is Russian Green from Vallejo and his web gear (or "belts") is Ceramcoat Autumn Brown with a little black mixed in. I've opted to base him on a 1 inch metal washer... which is my usual SOP for historical models. I had thought about putting him on a slotta base, but it just didn't seem right.

Thus far, really happy with him. Colors are nice and warm...yet not overly saturated. I've opted to go with my historical painting style rather than the style I use for models from Reaper or Games Workshop. Not really the kind of model where a lot of blending and glazing works out too well. However, I have been slipping in a few glazes here and there and some extreme highlighting on the highest points of the clothing. 

Now I'm off to feed the dogs as Bruno is yowling from downstairs.

Friday, August 29, 2014

Great Expectations (and really, really crappy results)


A frustrating week on the painting front to say the least. Since returning from Gen Con, I have started at least 6 or 7 models...and these two are all that is left of the pack. 

Luckily, Russian Guyovich on the right is going pretty decently. Didn't find any flash on him after primering or any awful mold lines. If only the same could be said for Sir Chad on the right. Didn't notice his mold line until after primering. My plan is to paint around it and minimize it...obfuscate it if you will. Had he been a metal model...I'd have thrown him in the jar of Pinesol and started over again...however he's a Bones model and you don't buy those if you are planning to do any fancy painting (Bones are great for monsters but not so much for PCs and NPCs).

Starting this weekend, I'm going to take a couple of steps to increase my focus and productivity. I have a horrible habit of painting with movies or shows streaming on the PC next to my painting desk. While I like to say it's just background noise... I catch myself watching it instead of painting. So, as of Saturday it's back to the good old iPod and headphones approach I used to use before we moved.

Also this weekend, some store nearby is having a 40% off all their GW models. Needless to say, I shall be picking stuff up... possibly even the Stormclaw box. That would mean I would have three different Space Marine armies in various stages (and that doesn't count my Imperial Guard, Chaos Marines, and Space Orks...which are my favorite).

Monday, August 25, 2014

Thunderbutt & Mister Smokey...


Quick update from the bench. Little bit of work on Sir Beef and starting on his servant Chad. 

I've based Chad on a metal washer as he's a Reaper Bones model...so he really needs something to give him some weight so he won't tip over. I'm actually considering rebasing Sir Beef on a metal washer just for consistency's sake. Or maybe I might redo Chad's base with similar gravel and sand (I think the one he's on is from four years ago...different sad and I think I even added water putty to bulk up the base). He's primered with Army Painter Uniform Gray...which I then quickly painted with Apple Barrel black paint mixed with little Liquitex Flow Improver. I didn't go for complete or opaque coverage, just enough to get it in the recesses. The orc I did previously had a lot of areas that were difficult to get to and I really regret not giving him a coat of black prior to painting.

Also, cannot stress this enough... wash your Bones models with soap and water before primering. You should actually wash every plastic model with soap and water prior to primering.

Didn't get much more done as I had about an hour and a half to paint tonight...although I'm hoping to score a few hours Tuesday night.

Sunday, August 24, 2014

Sir Beef Cubesteak

In Progress shot of the week. 

Had a terrible week of painting starts and stops...I think I ended up throwing two or three in the Simple Green and a few in the Pinesol (I use SG for plastics, Pinesol for metal). Incredible frustrating to say the least. Still, those kind of weeks occur and you just have to suck it up and drive on.

Luckily, Sir Beef here managed to avoid "the Dip". I can't remember the name of the model, but I know it says he's a Ranger. Still, I'm going to use him as a Fighter, but I might add some woodland themed freehand to his tunic or cloak to maybe hint he's a fella that likes to hang out in the wilderness.

I have opted for the color scheme used by GW on the LotR Warriors of Rohan (and I swear they used a similar one for Farmir's Rangers). I'm using Soviet Green on his cloak...it gives it a softer and warmer look...and it looks like it would be awfully snuggly. His tunic got a coat of Ceramcoat Spice Brown mixed with Apple Barrel Barn Red...I think I highlighted it by simply adding white. I sort of did a shaded basecoat approach and pained the recessed areas darker.

For his fleshtone, I mixed a little Testor's Skin Tone Warm Tint in with my usual custom mix to give a ruddier complexion. If you were a fan of Polly S fantasy paints, the Testor's ones use the same formulations and dry with a similar finish. I for one used a lot of Polly S in the 90s...and their black primer is still the best.

I'm planning on going sort of Bruce Campbell with him...so I'm going to keep him clean shaven to really emphasize that chin. I'll also give him a little gray hair on the sides...he's the big beefy hero type for my warband and that will get across the whole "grizzled veteran" thing.

I based him on a Wargames Factory flat plastic base. They are about the right size and style if you want to mix in some prepainted D&D models (or the Pathfinder ones...not judging). I also like them as it places your character a little more in his environment.

Stay tuned this week as I attempt to finish him up and start on one of his companions (or a Vor model...I primed a bunch of stuff and I have a terrible attention span).

Sunday, August 17, 2014

The Great Gen Con 2014 Haul (Or How I Managed To Not Spend A Ton On Minis For Once)


So this is my haul for this year. Kind of proud of myself as I didn't go completely nuts and purchased every shiny thing I wanted (as there was a lot).

This year's haul mainly consists of the various dog miniatures from Dark Sword (there are a few missing, but I got the main ones I wanted) and various "classic" models from Iron Wind/Partha. Last year I spent $75 at Partha, but this year that honor went to Dark Sword. Still, I did managed to wrack up a healthy $25 at Iron Wind and got some really cool monsters, player characters, and scantily clad women.

Things I did not get this year that I wish I could have:
  • Arcadia Quest - Isn't out for retail sale just yet. Holy crap it looks cooler than Super Dungeon Explore.
  • Various others - Vendors like Center Stage were missing from the show this year. But, I do intend on purchasing some of their items online over the coming months.
<rant> I wanted to buy from many other miniature vendors at the show, however I ran into a major problem... integrated demo tables in the sales space. I understand you need to do demos  to get the fans excited (although how watching a boardgame, roleplaying or miniature game demo is exciting is beyond me...maybe it's like watching football or something), but if I can't get to your stock, I can't buy anything. I won't name any names, but this was EVERYWHERE in there this year. So please, seperate areas for sales and demos next year? Just have one side tables...the other stuff to buy. I realize you all have limited booth space (and did you need to have a 4x6 table in there in the first place), but again...if the consumer can't get to it, they can't buy it. </rant>

Saw a lot of interesting products this year...Star Wars "Descent", Star Wars Armada, Dark Heresy II, Wrath of Kings (although I didn't see any models for sale and it was the second item on my list of stuff to get), and Arcadia Quest (yes, I mentioned it twice...it looked really cool).

CMoN had some fantastic dioramas set up for their products. Other miniature exhibitors really need to take note on CMoN's presentation...if you have a game, just having a collection of models on display isn't enough. A really well done diorama can get the feel and mood of a game across better than someone trying to explain it. There was a reason GW used to do those in the back of every WD issue. 

So to wrap up my rambling... lot of cool stuff which I couldn't get to and therefore could not buy.


Sunday, August 10, 2014

Finished my first Reaper Bones model....


While I don't think it's as nice as it could have been, for my first Reaper Bones model it turned out pretty well. I decided from the outset that to attempt to do a high end competition paint job on this guy would lead to madness. However, something between a tabletop standard and a collector standard would work....sort of a Dallimore meets the classic 'Eavy Metal style. All things considered, I'm happy with him and I think he'll do nicely as a big bad in a dungeon crawl. I do think I'll hit the edge of his base one more time to make sure it's nice and protected...then he'll get the proper a proper photo shoot.

But as this is the first Bones model, I'd like to share some of my thoughts on them.

  • They are fantastic for adding huge amounts of monsters to your D&D (Pathfinder, Castles & Crusades, etc..) collection. Ogres, Orcs, Minotaurs, Dragons, Skeletons...they have tons of models and the prices are right. I myself got about 20 models for under $30...that includes a full 8 man mob of Orcs, a small band of Goblins (6), as well as assorted NPCs.
  • They paint up real nice. The detail can be a little shallow and some areas may not cast up completely, but with a little ingenuity you can disguise these pretty well (or if you are handy with greenstuff, you can fix it up). My tabletop painting style works well for these models thus far, but I do hope as they continue to add releases they will refine their casting techniques.
  • Did I mention they easy on the wallet? Yes, but it deserves a second mention.
  • They are not perfect right out of the box. Some models require blades and polearms to be straightened out. Some require mold lines to be scraped or sanded.
  • They are one piece (for the most part). That means there will be some awkward areas you won't be able to reach on your model. It also means that some of the details will be missing. 
All things considered, I'd give Bones a 4.5 out of 5. Some small production issues, but overall the models look great once painted and their price point cannot be beaten.

Sunday, August 3, 2014

Hot Sunday Orc Booty


Some sweet, sweet Orc ass to light your Sunday afternoon on fire.

I would like to say one thing about this particular model...there was a reason the metal one was in four pieces. Why in the name of all that is holy would you make it a one part model? I'd have gladly shelled out an extra buck or two for a detached shield arm. Alas, have to make due with what I have. Still happy with Reaper's Bones stuff...just frustrated at the lack of access I have to certain parts of this model. Want to paint the boots and arm behind that shield...good luck.

Okay, enough complaining...let's get on the good stuff.

As you can see, I've done the bulk of the metallics. Not too happy with the Axe but large blade areas are not a specialty of mine. I did attempt to add some shading to it by adding some brown and rust glazes...but again, large blade areas are not my specialty. I had thought about adding some sort of freehand design...but then I figured he's an orc...they don't do that sort of thing. The gold turned out particularly nice although you can't see it in the photo. 

I also finished up his cape/cloak. I tried to mix things up by adding various flesh tones to the cape...like it's made of stitched together flesh flayed from his victims. I will probably add another highlight to those pieces to make them pop more. 

The fur...I'm kinda iffy on that. While I'd like to do more with it, the inconsistency in the texture itself makes that kinda difficult. If this were a model I was painting for a competition or commission, I'd probably get a little more detailed in the fur and add some different highlights...but this model is just for fun and testing out what I can do with the Bones stuff. I will say that painting this version makes me want to dig out the metal one I have around here and actually paint it to a high standard (and a much fancier base).

So getting very close to completion...just a few more things and its done. Then, I'm gonna paint something much smaller and less time consuming...and not a Bones model.


Thursday, July 31, 2014

Orc and the Fat Undead Man


Tonight marks the first appearance of a Zombicide model on my blog. I've been on the fence about picking up the game... but I'm slowly coming around. To sort of ease myself into things, I picked up the Angry Zombies expansion pack...gives me 24 zombie models to mess around with (also, they are all in prison jump suits which is pretty cool too...well...gives me an excuse to paint orange). First one out is a fattie...he kinda looks like if William Conrad were an undead biker doing time upstate...and some one stole his danish. Nah...William Conrad was way fatter...and I friggin' hated Cannon.

Spent a little time on the Orc tonight and last night. Finished his tunic and "skirt". I even did a very light glaze of Vallejo Russian Green to mute things a little as his gear and clothing would be weathered. I also spent some time blacking out the areas on his armor where I'll be painting metallics. His armor is going to be a combo of rusty metal and black "enameled" surfaces. I imagine his shin plates will be the black surface while the knee and toecap will be metallic. Fun part is figuring out a different shade of brown for the leather on his boots and straps. I think his shield will follow suit. I'm planning on using these guys as "Great Orcs"...sort of like Black Orcs...but more D&D/Pathfindery. Probably going to use Mantic Orcs as their lesser brethren...and Reaper goblins as their flunkies. Sort of the same classification of goblinoids from LotR (Uruk Hai, Orc, Goblin). Luckily, the Reaper Ogres are even more massive than these guys...really with GW would do this with their fantasy Orcs.

What's really crappy I think I maybe spent about an hour and half painting this evening. But that is expected the weeks leading up to Gen Con.  Definitely contemplating some vacation time post Gen Con to rest up and paint things (because you know I'm going to come back with more stuff).

Join me again Saturday evening when I hopefully will be showing off the finished Orc and possibly the first stages of the Necromancer/Wizard looking guy I got up next. 

Tuesday, July 29, 2014

Reaper Bones pt...hell...2.3? Yeah...2.3.

Not as much progress as I'd hoped today, but I always seem to be short on time before Gen Con. 

Today I added sand and gravel to his base and attached it with Aileen's Tacky Glue. If you are a miniature enthusiast and do not know of this wondrous stuff...go to a craft store and pick some up. I actually found out about it through my wife...as I "borrowed" her craft glue one night after I'd run out of Elmer's Wood Glue. The best thing of all is, if you don't like the way it looks....wait until it dries and you can peel it off.

The other new addition today is the reddish brown for his rest of his "cloth" stuff. I had originally thought of going with stripes or something to give him a little more personality...but then figured he's an orc and he wouldn't really give a crap about such things.

I've also been hand painting the fur on his cape (which you cannot see). As I stated last night, I wanted to drybrush...but the detail on the fur isn't so hot in a lot of places. So, I've opted for the old Foundry style of painting fur...aka with patience and a fine tip brush. Haven't had to paint fur like this in a long, long time.

That's about all I've done to him today. I think I had about an hour or so to throw at him today. I do plan to finish him by Friday night...have to...I have 5 more orcs coming in on Thursday.

Monday, July 28, 2014

Reaper Bones Pt 2

Put another couple of hours in on the orc this evening. I would have had more done, but I had some color scheme change ups and me totally futzing up the first pass at the armor (trust me it was bad).

So the first thing you might notice is the new "base". Right now it's just a primered fender washer, but at some point in the next day or two it will get textured, painted, and finally flocked. Normally, I base before I primer...but since this was the test run I didn't want to complicate things anymore than necessary (I had no idea how the primer was going to adhere or if the glue I'm using would even stick). 

I finished out his face, although his teeth need another couple of hits before I call them done. I went with yellow eyes as I was looking to change things up from my GW Orcs (also, the GW Orcs are going back into the army and my D&D/Warhammer Quest Orcs will be Reaper ones...just more fearsome looking).

Since he is wearing some armor pieces similar to a Roman themed model I painted years ago...I decided to give his tunic and armor a similar treatment. The tunic is painted with a mixture of Ceramcoat Barn Red and Apple Barrel Flag Red. I shaded that with a wash of Golden Raw Umber. I will actually go back and line in some of the darker areas with that same color...especially around the belt and armor.

His armor plates were undercoated black first...then a base coat of Vallejo Natural  Steel tinted with as small amount of Golden Raw Umber. I then gave the armor a wash of Golden Raw Umber with a drop of Apple Barrel black...gives it a dirty and greasy appearance. I then went back and painted the edges Vallejo Natural Steel with a small amount of Folk Art Pearl white added in. I'll do a final highlight of pure Pearl White once the model is done along with a glaze of Vallejo Rust Wash.

I have to say, I'm really surprised at how he's turning out. I was expecting it to look more like a painted toy, but it is turning out like an actual metal model. The only drawback I see is there is always a couple of spots on the model where the detail gets messed up due to mold. On this model, the side of his face closest to his axe arm loses some detail...and the top of his shoulder...the fur pelt he's wearing goes smoooth. Actually, the definition on the chain mail and fur could be the biggest snags for this model. I've actually decided to go the Foundry route and paint the fur with a fine tip brush (a pain in the ass, but worth it).

Sunday, July 27, 2014

Reaper Bones (Sorry no fart or dong jokes this week*)...

(*out of dick jokes as I'm utterly burned out from Gen Con product prep and an 8 hour driving marathon on Saturday...although I did get some good BBQ on my excursion.)

After months of searching for the right primer (where I didn't have to pay more for shipping than the primer) I finally managed to score some Army Painter Uniform Gray.

I first washed the miniature in soapy water and let dry over night which should have removed any remaining "break free" solution from the plastic. I do this with all my plastic models except for GW as I've had no problems painting their stuff right out of the box. Everybody else gets a thorough cleaning...Wargames Factory, Victrix, Zombicide...everybody.

After the mini is dry, I give it a quick once over to remove any funky bits or flash. On this one, I found one bit of flash in his mouth. Kinda sucks as the definition on his lower teeth is already bad enough and throw that on top and I'm doing my least favorite thing in miniature painting...interpretive painting. Hopefully, I get the teeth right.

I undercoated the model with Army Painter Uniform Gray. I had though about going with black, but I'm using this primer for Super Dungeon Explore and Zombicide models too and the bulk of those have really bright colors.

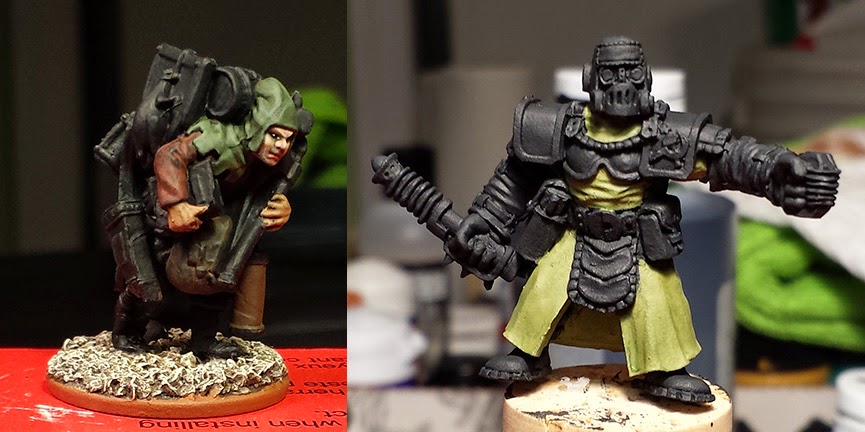
As you can see, no real basing for him yet. I stuck him on an old plastic base from a Vor model just so I could start painting. I'll probably give him a 2 inch washer base so he is based in a similar fashion to my other models. I cannot stand it when models are based differently in a collection...makes my OCD go nuts.

I'm currently using a custom color I made by mixing Ceramcoat Kelly Green with Ceramcoat Golden Brown. I'm using Ceramcoat Pine Green and Golden Raw Umber to shade him. I am adding Vallejo Undead Flesh to the green to create my highlights. You can see some faint hints of Apple Barrel Tropic Orange on his nose, lower lip, and the tips of his ears. Keeping it faint as I'm just trying to add a little warmth to his flesh tone.

At the moment, my opinion of Reaper Bones models has just gone up. Yes, they require a little more prep time than a metal model from Reaper...but the price point more than makes up for it. Seriously, I have 15 models on the way to me that I paid under 30 bucks for including shipping. 

One thing I will say, Bones are fantastic for adding hordes of monsters to your D&D/Pathfinder games...but I'm still not so keen on using Bones for character or NPC models. Hopefully, my opinion will change once I start painting Hellakin.

Sunday, July 13, 2014

Chronopia...


As of late, I've been thinking about working on a Chronopia model. I've always entertained the notion of giving some really cool old models a more "grown up" paint scheme...less garish colors, some blending, a bit of weathering, and a fancy new base. I actually started on that back in  08 when I painted a Warzone Gray Ghost in a more practical military color scheme and based her on a fancy Warmachine styled lipped base. 

Now, I want to give some Chronopia models that kind of love and attention. At first, I'd thought about going for the easy kill and grabbing some of the SoK models Kev White sculpted...but I wanted a bit more of a challenge (and something with less fleshtone to shade). I pondered Dwarves, Firstborn, Stygian, and maybe even Blackblood...but I settled on Devout. So now I am working on a Devout Necromancer like the one in the image below.

Definitely not going to go with this color scheme...the blue skull is a bit odd for me. Probably go with dark and brooding...lots of black and maybe a touch of red here and there. I also have to admit, the model I have is nowhere near as nicely cast as the model in the photo...but then that's been the case with about 90% of my Chronopia models. I don't know if shoddy casting was a major problem at Heartbreaker, all I know is every model I've ever gotten from them has been shit casting (I have warzone models that are just awful).

So, wish me luck and hopefully I won't get fed up with the model and chuck it in the stripper.

Friday, July 11, 2014

Boners and Orcs and Boners...oh my!


Managed to find a little spare time this week to work on a couple of Warhammer models for my Warhammer Quest collection. 

The skeleton model on the left is actually a finished model. I actually finished the skeleton portion of him a wee or two ago, but I couldn't complete him until the shields I bought on eBay arrived. Rather than use the horrible "coffin lid" shields I had purchased for them years ago (like in 2000), I opted to use shields from the more recent VC skeletons. Thus far they work pretty good...just remember to cut off the lower "shield handle" thing as those big hands don't fit. Pretty happy with the way the shield turned out...even though you can't really tell on the photo. I used Folk Art Midnight as a midtone and then added small amounts of Ceramcoat Bungalow Blue.

SIDENOTE-Yes, I use craft paint (Ceramcoat, Apple Barrel, Folk Art, Americana) about 75% of the time. I started using them in 2001 as at the time, your paint options were limited to GW, Coat d'Arms, and Ral Partha (and Partha had just closed down). However, with the current variety out there now I have been adding more and more miniature paints back into rotation.

The other skeleton has been in a state of almost done for the last 10 years. I'm currently working on his shield.

Orc boy caught in the middle of "Bonerfest" is from the 2000 version of Warhammer. Even though they are only two piece models, they have a lot of nice detail to them. I'm actually using GW Lorien Green for his fleshtone and shading it with Ceramcoat Pine Green. His tunic has been basecoated with a mix of Ceramcoat Bright Red and Apple Barrel Barn Red. Usually, I'd have used Mecharite Red...but this time I wanted a warmer red. I'll probably end up shading it with GW Agrax Earthshade (gonna try out one of the new inks).

I'm going for a "classic" Eavy Metal styled paint job on these. Kind of fitting when you think about it as all three of these models were from the late 90s/early 2000s era GW. While I really dig a lot of the newer painting styles out there nowadays...the classic GW style is still my favorite. The works of Mike McVey, Jakob Nielsen, Tim Prow, and Martin Footit are still the pinnacle of GW painting for me.

That concludes this week's blog post. Now I'm gonna go take a short nap.


Monday, June 30, 2014

The Quest for Warhammer Quest...

originally posted @ eldritch epistles. 
When I originally saw the photo of this diorama, I knew then and there that Warhammer Quest was the GW game for me. Unfortunately, it was the one GW game I have never been able to obtain as a boxed game. I have some of the models and pdf downloads of the books and tiles, but not the genuine article. 

And let's be honest, there is no way I'm plopping down close to $200 on Ebay for one.

So, the only way I'm going to get my Warhammer Quest fix on is to go full on DIY with it. 

As of this moment, I'm working on painting up a group of plastic Skeletons from the late 90s and a Vampire/wizard to lead them (also from the classic era). While I'm trying to stick with classic models, I do plan to add some of the newer VC vampires and ghouls in as well. Just wish I didn't sell off all my plastic GW zombies before we moved....but I can probably pick some up cheap on ebay. Or...I could use Mantic zombies as a worst case scenario.

I don't know whether I'll ever end up building 3D custom tiles..especially since there are so many tile sets for sale at Drivethrurpg. Literally...a shit ton of dungeon tiles.

I will however be building some backdrops for photographing the models (along with all my other fantasy models) using Mike McVey's diorama as inspiration.

Sunday, June 15, 2014

Some guy and a pirate...


This week I've been working on a Steel Legion trooper from my Imperial Gu…errr…uh…Astra Militarum collection.  I picked this guy and a gaggle of his buddies up on eBay back in 2000 (I also picked up a Sentinel to go with them….but the asshole seller never sent it). 

I'm attempting to give the model a more modern style paint scheme…more warm muted earth tones inspired by World War 2 military color schemes. It's almost the same color palette as my WW2 Soviets…and my 40k Valhallans.

For the overcoat, I'm using Vallejo Khaki which was shaded with Vallejo English Uniform. I've added some highlights, but I'm trying to keep them subtle as I think "extreme highlighting" on cloth just looks awful (and apparently it's all the GW painters do now). I'm going to add another layer or two of highlights before calling the overcoat done.

His helmet, trousers, and large pieces of kit are Vallejo Russian Green. Normally, it's a color I'd only use for helmets and other metal objects…but I think it'll work nicely to break up all the brown on his legs.

The boots, gloves, and the rest of his kit are getting Ceramcoat Spice Brown with a bit of Ceramcoat Charcoal mixed in. I'm probably going to add a bit more to desaturate that brown. I'll highlight by adding a light gray to the base mixture…which should give it a worn and faded look. 

A side note, the models from 2000 pale in comparison to the more modern models. Heck, compare these to models from 2004-2006 and you'd think it was another company. 

This handsome bastard is a pirate from Wargames Foundry. He's painted in the usual Dallimore influenced style I use for those types of models (technically, I use that style for all my historicals). I kept the color scheme simple…Reaper Dragon blue for his head scarf…Reaper Orc Flesh for his shirt…and a custom brownish red for his pants. Trust me, it's there…you'll be able to see once I do the "glamour" shots of these guys.

That's all for this week. Now I'm going to run outside and cover the grill as I hear thunder.

Monday, June 2, 2014

In Russia…no I don't like this mini enough to even bother finishing this zinger...

Ever have a model that you start painting but then realize half way through it is gonna turn out like ass? Yet you still keep painting as you've already sunk a ton of time into it. Tons of precious time you could have spent on something else…but no you had to finish "it".

If you answered yes, then you will understand the situation I was in with Yuri over there. 

Just couldn't justify throwing him away after putting in some serious hours on him…although looking at him you couldn't tell. Detailing which I thought would look nice once it was painted did not…and those straps that make up his sleeves…ugh. The only thing I actually like about the model are the hard armor bits as it gave me an excuse to try out my Vallejo Soviet Armor Green (which I like). But the folds in the clothing…the face…the hands…not so great. Things like the face and hands I suspect were do to bad casting (smushed face, lack of clean detail in on the hands). Other stuff…who knows. All I know is while there were two of these guys in the package…I will only be painting the one. 

So in conclusion, I wish I'd painted another historical models instead.

Thursday, May 15, 2014

Pee Shark and Crumpets....

First up are some Wargames Factory Viking Huscarls. These will eventually be part of my big Viking Raiding Party which I started collecting about 14 years ago (seems like only yesterday). I'm painting them in batches of 3 so I can mix up the color scheme a little in order to give them the crazy mismatched look the Vikings had.

From what I can tell, the colors I'm using are mostly historically accurate (I'm not sure what shade of blue they had access to, but they did have blue...and that sort of thing). 

As far as the models themselves go, I wish there were some more "heroic" scale and not realistic scale...those weapons are just so tiny and fragile. 

Next up is an explorer from Foundry for their Darkest Africa line. I've actually painted this model three times now...and not three seperate models...this model...three times. I finally have him the way I like him now.

He is accompanied by an old GW Blood Bowl Orc player. The model is slightly modded as his helmet spike broke...so I smoothed out the top and voila! I went with a painting style and color scheme that was used during that time. I like to think of it as a "Classic McVey" styled paint job...lots of bright color, cleanly painted and blended. You can't see it in the photo, but there is about 5 shades of red on those shoulder pads and three shades of brown around the toes of those shoes. I won't even go into the fleshtone. My intent was to make the orc look like it would have back in teh day when I bought it...if I could paint as well then as I do now. Trust me, that made sense.

Blog Archive